

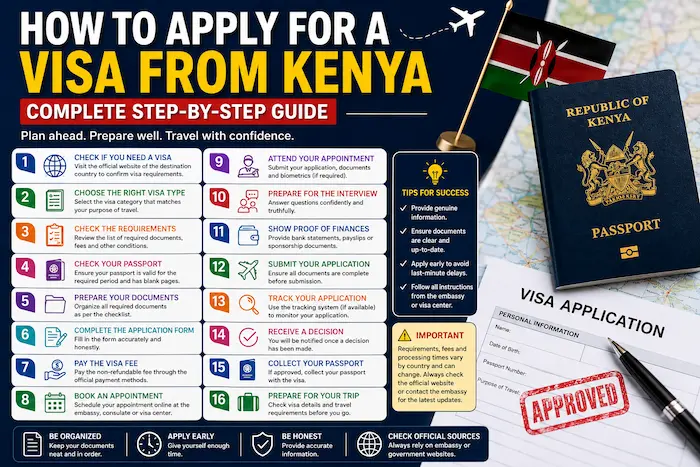

Planning to travel from Kenya for tourism, business, study, work or to visit family? Depending on your destination and nationality, you may need to obtain a visa before travelling.
The visa application process can feel complicated, especially for first-time travellers. However, with the right documents and preparation, you can make the process much easier.
This guide explains how to apply for a visa from Kenya, what documents you may need, how to prepare for an interview and how to avoid common mistakes.
Important: Visa requirements, fees, processing times and application procedures vary by destination and can change. Always confirm the latest requirements with the destination country’s official embassy, consulate or immigration website before submitting an application.
1. Check Whether You Need a Visa
The first step is determining whether Kenyan passport holders need a visa for your destination.
Depending on the country, you may need:
- A traditional visa
- An eVisa
- An Electronic Travel Authorization (ETA)
- A visa on arrival
- No visa for a specified period
Do not assume that a visa is required simply because you are travelling internationally. Requirements depend on your destination, purpose and circumstances.
2. Choose the Correct Visa Category
If you need a visa, identify the correct category before applying.
Common categories include:
- Tourist visa – for holidays and tourism
- Business visa – for business activities and meetings
- Student visa – for education
- Work visa – for employment
- Family/visit visa – for visiting relatives or friends
- Transit visa – for passing through a country
- Medical visa – for certain medical treatments
Applying under the wrong category can cause delays or even a refusal.
3. Check the Official Requirements
Once you know the visa category, visit the destination country’s official immigration website or the website of its embassy/consulate responsible for applications in Kenya.
Requirements commonly include:
- Valid Kenyan passport
- Completed visa application form
- Passport-size photographs
- Proof of accommodation
- Travel itinerary
- Bank statements or other financial evidence
- Employment or business documents
- Invitation letter, where applicable
- Travel insurance, where required
- Proof of payment
- Previous travel or visa records, where relevant
However, do not assume that every visa requires all of these documents. Use the official checklist for your particular application.
4. Check Your Passport
Before applying, check your passport carefully.
Make sure:
- Your passport is valid for the period required by the destination country.
- Your personal details are correct.
- You have sufficient blank pages if required.
- Your passport is not damaged.
Some countries require a passport to remain valid for a specific period beyond your planned stay.
5. Prepare Your Documents
Create a dedicated visa application folder.
A useful arrangement is:
Section 1 — Application Documents
- Application form
- Appointment confirmation
- Payment receipt
Section 2 — Passport & Identification
- Original passport
- Passport copy
- Identification documents where required
Section 3 — Financial Documents
- Bank statements
- Bank letter
- Payslips
- Other financial evidence requested
Section 4 — Employment or Business
- Employment letter
- Leave approval
- Business registration documents
- Tax documents where required
Section 5 — Travel Documents
- Travel itinerary
- Accommodation details
- Invitation letter
- Travel insurance
Section 6 — Supporting Documents
- Academic documents
- Previous visas
- Family documents
- Other documents specifically requested
Keeping everything organized makes it easier to respond when a visa officer asks for a particular document.
6. Complete the Visa Application Form
Fill out the application carefully.
Pay particular attention to:
- Full name
- Date of birth
- Passport number
- Travel dates
- Employment details
- Travel history
- Accommodation
- Purpose of travel
- Contact information
Your answers should be truthful and consistent with your supporting documents.
If your application says you are travelling for tourism but your supporting documents indicate a different purpose, this could raise questions.
7. Pay the Visa Application Fee
Most visa applications require a fee.
The amount depends on:
- Destination country
- Visa category
- Duration of stay
- Number of entries
- Applicant’s circumstances
Use only the payment method specified by the official visa application channel.
Keep your payment receipt because you may need it during your appointment.
8. Book a Visa Appointment
Some visa applications are entirely online, while others require an appointment at an embassy, consulate or visa application centre.
If an appointment is required, select an available date and time through the official booking system.
Print or save your appointment confirmation.
9. Attend the Visa Appointment
If your application requires an in-person appointment, arrive early.
Carry:
- Passport
- Application confirmation
- Appointment confirmation
- Payment receipt
- Required original documents
- Copies of documents where requested
- Photographs if required
Depending on the destination, you may also have your fingerprints and photograph captured.
10. Prepare for the Visa Interview
Not every visa application requires an interview, but some applicants may be asked questions about their trip.
Common questions can include:
Why are you travelling?
Give a clear and truthful answer.
Where will you stay?
Know your accommodation arrangements.
Who is paying for your trip?
Be prepared to explain your source of funds or sponsorship.
What do you do for a living?
Explain your employment or business clearly.
How long will you stay?
Your answer should be consistent with your application.
Do you have family or friends in the destination country?
Answer honestly.
Don’t Memorize Fake Answers
A visa interview is not an examination where you need to memorize a script.
Understand your own application and answer questions naturally and truthfully.
11. Show That Your Travel Plans Make Sense
For temporary travel, your application should clearly explain:
Why are you travelling?
How will you finance the trip?
Where will you stay?
How long will you stay?
What will you do during the trip?
Your supporting documents should support the information you provide.
12. Prepare Your Financial Documents Carefully
Financial evidence is an important part of many visa applications.
Depending on the destination, you may be asked for:
- Recent bank statements
- Payslips
- Employment letter
- Business financial records
- Tax documents
- Sponsorship evidence
Avoid making unexplained large deposits simply before submitting your application.
If there are unusual transactions in your account, be prepared to explain them honestly if requested.
13. If Someone Is Sponsoring Your Trip
If another person is paying for your travel, prepare the relevant sponsorship documents.
These may include:
- Sponsorship letter
- Sponsor’s identification
- Sponsor’s bank statements
- Proof of relationship
- Invitation letter
- Proof of the sponsor’s legal status, where required
The exact requirements depend on the destination and visa category.
14. Submit Your Application
Once you have completed the application and provided the required documents, submit it through the official channel.
Depending on the destination, this could be:
- Online
- At an embassy
- At a consulate
- Through an authorized visa application centre
Always verify that the organization accepting your application is officially authorized.
15. Track Your Application
Some countries provide online application tracking.
You may be able to track your application using:
- Application number
- Passport number
- Reference number
- Email account
Processing times vary considerably by country and visa category.
Avoid making non-refundable travel commitments based solely on an estimated processing time unless the relevant authority advises otherwise.
16. What Happens After a Visa Decision?
If your application is approved, check your visa carefully.
Verify:
- Your name
- Passport number
- Visa type
- Validity dates
- Number of entries
- Permitted length of stay
If you notice an error, contact the relevant visa authority immediately.
If Your Visa Is Refused
Don’t panic.
Read the refusal notice carefully. Some countries explain the reason for refusal and whether you can:
- Reapply
- Appeal
- Request administrative review
- Provide additional information
If you reapply, address the issues identified rather than simply submitting exactly the same application.
Common Visa Application Mistakes to Avoid
❌ Providing false information
Always provide accurate information.
❌ Using fake documents
Never submit fraudulent bank statements, employment letters, invitation letters or other documents.
❌ Applying for the wrong visa
Make sure the visa category matches your actual purpose of travel.
❌ Ignoring the official checklist
Requirements vary by destination.
❌ Giving inconsistent information
Your application, documents and interview answers should tell the same truthful story.
❌ Waiting until the last minute
Give yourself enough time to gather documents and complete the process.
❌ Relying on agents without verification
If you use an immigration or travel agent, verify their legitimacy and still confirm requirements directly with the relevant government authority.
How Much Money Do You Need for a Visa?
There is no universal amount that guarantees visa approval.
Financial requirements depend on:
- Destination
- Length of stay
- Accommodation
- Purpose of travel
- Number of travellers
- Visa category
- Whether someone else is sponsoring you
The important thing is to provide genuine financial evidence that reasonably supports your planned trip and complies with the destination country’s requirements.
How Early Should You Apply?
There is no single answer for every country.
Some destinations process applications relatively quickly, while others can take considerably longer.
Before booking your trip, check the destination country’s current processing times and recommended application window.
For popular destinations, applying well ahead of your intended travel date is generally sensible.
Visa Application Checklist for Kenyans
Before submitting your application, ask yourself:
- Do I have a valid passport?
- Am I applying for the correct visa category?
- Have I checked the official requirements?
- Have I completed the application correctly?
- Do my documents support my application?
- Are my financial documents genuine and up to date?
- Do I have proof of accommodation if required?
- Do I have an itinerary or other travel evidence if required?
- Do I have an invitation or sponsorship letter if applicable?
- Have I paid the correct fee?
- Have I booked an appointment if required?
- Have I prepared for possible interview questions?
- Have I checked the official processing time?
Final Thoughts
Applying for a visa from Kenya doesn’t have to be overwhelming.
The key is preparation, accuracy and organization.
Start by checking whether you need a visa, choose the correct visa category, read the official requirements, prepare genuine supporting documents, submit the application through the correct channel and prepare to answer questions honestly if an interview is required.
Most importantly, do not rely on outdated visa information from social media or unofficial websites. Visa rules can change, so always confirm the latest requirements directly with the destination country’s official immigration authority, embassy or authorized visa application centre.
