
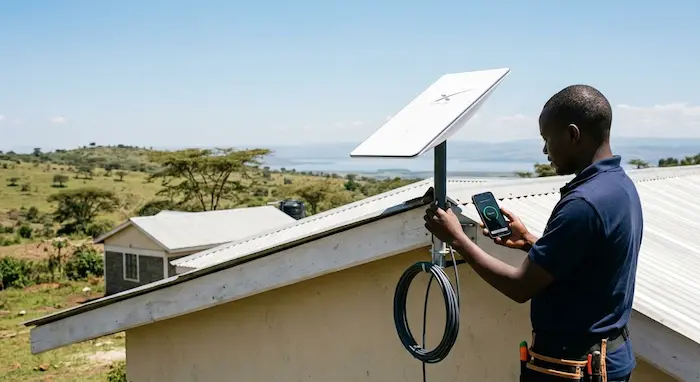

If you have bought Starlink in Kenya and are wondering how to install it, where to place the dish, how much installation may cost and what to do when the connection is not working, this guide covers the process from unboxing to getting online.
Starlink is designed to be relatively simple to set up, but where you install the dish can have a major impact on reliability.
The most important rule is simple: give the Starlink dish as clear a view of the sky as possible.
Starlink’s official installation guidance recommends using the Starlink app’s Check for Obstructions tool before permanently installing the dish. Trees, buildings, poles and other objects can interfere with the connection and cause interruptions.
What You Need to Install Starlink in Kenya
Before beginning, make sure you have:
- Your Starlink dish
- Starlink router
- Starlink cable
- Power cable and power supply
- A smartphone
- Starlink app
- A suitable installation location
- Appropriate mounting hardware if you are doing a permanent installation
The exact contents depend on the Starlink hardware generation you purchased. For example, Starlink’s current Standard 4 X setup documentation lists the Starlink terminal, kickstand, Router 3, a 15-metre cable, power cable and power supply.
Older Starlink generations can have different equipment and mounting requirements.
Check your kit before following a mounting guide designed for a different Starlink model.
Step 1: Download the Starlink App
Install the official Starlink app on your smartphone.
The app is an important part of installation because it helps you:
- Find a suitable location
- Check for obstructions
- Connect to the Starlink network
- Configure your Wi-Fi
- Check connection status
- Troubleshoot problems
- Access Starlink settings and support
The official installation guide recommends using the app’s obstruction-checking tool before choosing the final installation location.
Step 2: Find the Best Location
This is arguably the most important part of the entire installation.
Your Starlink needs a sufficiently clear view of the sky because satellites move overhead.
A tree that looks harmless from the ground can still interfere with the dish’s view of the sky.
Starlink’s installation documentation shows an approximately 110-degree field of view with a 20-degree elevation angle that should remain as clear as possible.
Avoid these locations
Do not place the dish where its view is blocked by:
- Tall trees
- Large buildings
- Water tanks
- Chimneys
- Walls
- Nearby poles
- Other structures
If the ground-level location has too many obstructions, Starlink recommends considering an elevated installation such as a roof, pole or wall.
Use the obstruction checker before drilling
Don’t permanently mount the dish based only on what looks like a good location.
Open the Starlink app and use the Check for Obstructions feature.
Walk around the property and test possible locations.
This can help you determine whether the roof, trees or nearby structures are likely to interfere with service.
Step 3: Test Starlink Before Permanent Installation
One of the best tips for Kenyan customers is to test the system before drilling holes or installing a permanent mount.
Place the dish in a temporary but stable location with a clear view of the sky.
Connect the cable.
Connect the router to power.
Then wait for the system to establish a connection.
This gives you an opportunity to confirm that the equipment works before committing to a permanent installation.
Step 4: Connect the Starlink Cable
For current Standard hardware, Starlink’s setup instructions say to lift the kickstand and connect the supplied cable to the Starlink terminal, ensuring the connector is fully seated. The other end connects to the router’s Starlink port.
Then connect the router and power supply.
Do not force the connector.
If the cable is not properly seated, the Starlink may fail to establish a connection.
Step 5: Connect to the Starlink Wi-Fi Network
Once the router is powered on, open Wi-Fi settings on your phone or computer.
Connect to the Starlink network.
Depending on the hardware and setup stage, the default network may initially appear as STARLINK.
Starlink recommends using the app to change the Wi-Fi network name and create a password.
Do this before regularly using the connection.
Step 6: Wait for Starlink to Connect
After powering the system, give it time to establish a satellite connection.
Starlink says the terminal can connect within minutes during initial setup, although software updates and other factors can affect the process.
The Starlink app will provide information about the connection and can alert you if the terminal needs alignment.
For newer Standard and Mini hardware, follow the alignment instructions provided by the app rather than assuming that every Starlink dish should be manually pointed in the same direction. Different generations work differently.
Starlink Mounting Options in Kenya
A temporary ground installation can be useful for testing.
For a permanent installation, however, many Kenyan homes will benefit from a properly secured roof, wall or pole installation if the ground location has obstructions.
Starlink offers different mounting accessories for different installation situations.
Roof Mounting
Roof mounting can be a good option when:
- Trees are blocking the ground-level view
- Nearby buildings are obstructing the sky
- The roof provides a safer clear-sky position
But roof installation should not be treated as a simple DIY project if you are uncomfortable working at height.
Use a suitable mount for your specific Starlink model and roof type.
Starlink itself recommends contacting a roofing or installation professional if you are unsure about completing a permanent installation.
Wall Mounting
A wall mount can be useful when the side of a building provides a sufficiently clear view of the sky.
The advantage is that it may avoid putting equipment directly on a roof.
However, the wall position still needs to provide the required clear view.
Pole Mounting
A pole can help raise the dish above trees and other obstacles.
But pole installations require appropriate hardware and secure anchoring.
Don’t simply attach the dish to an improvised pole and assume it will remain secure during strong winds.
Starlink also notes that pole-mount work is not included in its standard professional installation service, so customers should confirm what an installer actually covers before booking.
How Much Does Starlink Installation Cost in Kenya?
The total cost depends on whether you install the system yourself or pay someone to do it.
DIY installation
A basic self-installation can avoid a professional labour charge if your kit and location require no additional mounting hardware.
However, a permanent roof, wall or pole installation may require additional accessories.
Professional installation
Starlink confirms that third-party installation services are available in Kenya. Its standard professional installation can include selecting the dish location, mounting the dish, routing the cable to the home’s entry point, connecting the router, activating the system and testing performance.
Additional work can result in additional charges.
Examples include:
- Longer cable runs
- Trenching
- Difficult access
- Specialised cable routing
- Certain building types
- Extended travel
- Non-standard mounting requirements
Important: installation charges are separate from your Starlink service subscription and can vary. Check the current quote from the installer serving your location before publishing or advertising a specific installation price.
Starlink Installation Photos: What to Photograph
If you are updating this article for TechDrivers, don’t rely on text alone.
Add original installation photographs throughout the article.
Photo 1: Starlink kit
Show the box and equipment after unboxing.
Suggested caption:
Starlink equipment ready for installation in Kenya.
Photo 2: Testing the dish
Show the dish temporarily positioned with a clear view of the sky.
Suggested caption:
Testing the Starlink dish before permanent mounting.
Photo 3: Roof installation
Show the completed roof mount from a safe distance.
Suggested caption:
A permanently mounted Starlink dish with a clear view of the sky.
Photo 4: Cable routing
Show how the cable enters the building.
Suggested caption:
Starlink cable routed into the building and connected to the router.
Photo 5: Router
Show the router powered on.
Suggested caption:
Starlink router connected and ready for configuration.
Photo 6: Starlink app
Show the relevant app screen demonstrating the connection or obstruction checker.
Suggested caption:
Using the Starlink app to check for obstructions and monitor the connection.
These photographs will make the article much more useful than a generic installation guide.
Common Starlink Problems in Kenya and How to Fix Them
1. Starlink Says There Are Obstructions
This usually means something is blocking part of the dish’s view of the sky.
Try:
- Moving the dish
- Removing nearby obstructions where practical
- Raising the dish
- Moving it to the roof
- Using a suitable wall or pole mount
The Starlink app’s obstruction tool should be your first diagnostic step.
2. Starlink Has Frequent Disconnections
Frequent interruptions can be caused by obstructions, connectivity problems or other environmental and hardware factors.
Check the Starlink app for alerts.
Then inspect the installation location.
A dish positioned beneath trees or beside a tall building may experience interruptions even when it initially appears to work.
3. Starlink Is Not Connecting
Check the basics first:
- Is the router receiving power?
- Is the Starlink cable properly connected?
- Is the dish receiving power?
- Is the Wi-Fi network visible?
- Does the app show an error?
- Is there a known service issue?
- Are there physical obstructions?
If you still cannot connect, use the Starlink app and support resources to diagnose the issue.
4. Wi-Fi Works Near the Router but Not in Other Rooms
This may be a Wi-Fi coverage problem rather than a satellite connection problem.
Try repositioning the router to a more central location.
Avoid placing it behind large appliances, inside enclosed cabinets or behind thick walls.
For larger homes, a compatible mesh setup may improve coverage.
Starlink’s guidance also recommends elevating the router and avoiding multiple obstructions where possible.
5. The Internet Is Slow
Don’t immediately assume that the dish is faulty.
First check:
- Device distance from the router
- Wi-Fi signal strength
- Number of connected devices
- Background downloads
- Obstructions
- Connection status in the Starlink app
- Whether the problem affects one device or the entire network
If only one phone or laptop is slow, the problem may be the device or its Wi-Fi connection.
If every connected device is experiencing poor performance, investigate the Starlink connection itself.
Important Starlink Mounting Advice for Kenyan Homes
Kenya’s weather and building conditions make a secure installation important.
Don’t mount the dish where it can easily fall
A poorly secured dish can damage property or injure someone.
Don’t drill before checking the sky
Use the app first.
Don’t hide the dish behind a wall
A strong-looking installation is useless if the building blocks the satellite view.
Don’t make unnecessary sharp cable bends
Cable routing should protect the cable from damage and avoid unnecessarily tight bends.
Don’t improvise mounting hardware
Use hardware appropriate for your Starlink model and the surface you’re attaching it to.
Don’t work on a roof if you’re not equipped to do so safely
Professional installation can be worth paying for when the job involves significant height, difficult access or specialised mounting.
DIY or Professional Installation?
For a simple temporary installation, DIY can be straightforward.
A permanent roof or elevated installation is different.
DIY may make sense if:
- You have a safe ground-level location
- The sky view is clear
- You understand basic cable connections
- You don’t need complicated mounting
- You are comfortable configuring the router
Hire an installer if:
- The dish needs to go on a high roof
- You need a specialised mount
- Cable routing is complicated
- You need to drill through walls or roofing
- The location has difficult access
- You are uncomfortable working at height
Starlink’s professional installation guidance specifically notes that standard installation covers certain services while specialised work can attract additional fees.
Starlink Installation Checklist
Before you finish the installation, confirm:
- The dish has a clear view of the sky
- You checked the location using the Starlink app
- The cables are fully connected
- The router has power
- Your Wi-Fi network is secured with a password
- The dish is securely mounted if permanently installed
- Cables are protected from unnecessary damage
- The app shows a healthy connection
- You have tested the internet on multiple devices
- You know how to access Starlink support
Final Verdict
Installing Starlink in Kenya is not simply about placing the dish on the roof and connecting a cable.
The installation location is one of the most important factors affecting your experience.
Test the system first, use the Starlink app to check for obstructions, choose the mounting position carefully and secure the equipment properly if you are installing it permanently.
For a straightforward ground-level setup, many users can complete the basic installation themselves.
For roof, pole or complicated cable installations, professional help can be the safer option.
And before paying an installer, ask exactly what is included in the quote.
With the right location and a properly secured installation, Starlink can provide a practical internet option for Kenyan homes, businesses and other locations where traditional connectivity may be limited.
