

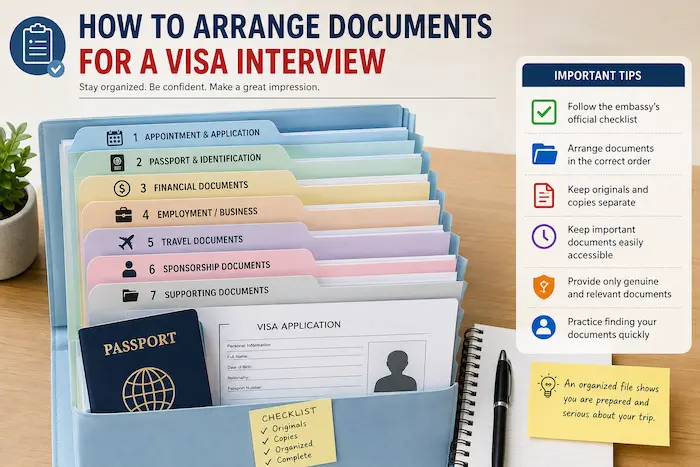

Preparing for a visa interview can be stressful, especially when you have many documents to carry. Even if you have all the required paperwork, poor organization can make it difficult to find a document when the visa officer asks for it.
A simple, well-organized document file can make your interview smoother and help you present yourself as prepared and confident.
Here is a practical guide on how to arrange your visa interview documents.
1. Start With the Embassy’s Official Checklist
Before arranging anything, check the official website of the embassy, consulate or visa application centre handling your application.
Visa requirements vary depending on:
- Country you are applying to
- Type of visa
- Purpose of travel
- Your personal circumstances
- Your nationality
Do not rely solely on lists shared on social media or by friends. Requirements can change.
Important: Only carry documents that are relevant to your application, while ensuring you have all mandatory documents requested by the embassy.
2. Put Your Most Important Documents First
A good arrangement is to place documents in an order that allows you to find them quickly.
A general arrangement can be:
Section 1: Appointment and Application Documents
Place these at the front:
- Visa appointment confirmation
- Visa application confirmation
- Application/reference number
- Payment receipt, where applicable
- Any instructions provided by the embassy or visa centre
These documents establish what appointment you are attending and make them easy to access.
3. Keep Your Passport Easily Accessible
Your passport is one of the most important documents.
Keep:
- Original passport
- Previous passports, if specifically required
- Copies of relevant passport pages, if requested
Avoid placing your passport deep inside your folder.
Keep it in an easily accessible section or separate passport holder.
4. Arrange Your Identification Documents
Create a section for your personal identification documents.
Depending on the visa requirements, this could include:
- National ID
- Birth certificate
- Marriage certificate, where applicable
- Passport photographs
- Other identity documents requested by the embassy
Keep originals separate from photocopies.
For example:
ORIGINALS
- Birth certificate
- National ID
COPIES
- Copy of birth certificate
- Copy of National ID
5. Arrange Your Financial Documents
Financial documents are commonly requested for visas where applicants need to demonstrate their ability to fund their trip.
Depending on the requirements, these may include:
- Bank statements
- Bank letters
- Payslips
- Employment records
- Tax documents
- Business registration documents
- Business bank statements
- Proof of assets
- Sponsorship documents
Arrange bank statements chronologically, preferably with the most recent statement first.
Do not alter or manipulate financial documents.
If a document is required in a particular format or period, follow the embassy’s instructions.
6. Put Employment or Business Documents Together
If you are employed, create an employment section containing applicable documents such as:
- Employment letter
- Leave approval letter
- Payslips
- Employment contract, if required
- Other proof of employment requested
If you own a business, relevant documents may include:
- Business registration documents
- Business permits
- Company bank statements
- Tax documents
- Evidence of business operations
The exact requirements depend on the visa category and destination country.
7. Arrange Your Travel Documents
Create another section for your travel-related documents.
Depending on the visa requirements, these could include:
- Travel itinerary
- Hotel/accommodation information
- Invitation letter
- Travel insurance
- Flight reservation, if required
- Details of your destination
- Conference or event registration
- School admission documents for students
Do not purchase non-refundable flights simply because you have a visa interview unless the relevant authorities specifically require it.
8. If Someone Is Sponsoring You, Create a Separate Section
If another person or organization is paying for your trip, keep sponsorship documents together.
These could include:
- Sponsorship letter
- Sponsor’s identification documents
- Sponsor’s financial documents
- Proof of relationship
- Invitation letter
- Evidence of the sponsor’s status, where relevant
Make it easy for the visa officer to understand who is sponsoring you and why.
9. Arrange Supporting Documents
Supporting documents should come after your main documents.
These might include:
- Previous visas
- Previous travel records
- Academic documents
- Professional certificates
- Property documents
- Family-related documents
- Correspondence relevant to the application
Only include documents that are relevant and legitimate.
More documents do not automatically mean a stronger application.
10. Separate Originals and Copies
One of the simplest ways to avoid confusion is to separate originals from photocopies.
A folder could look like this:
Section A — Appointment
Section B — Passport & Identification
Section C — Financial Documents
Section D — Employment/Business
Section E — Travel Documents
Section F — Sponsorship
Section G — Supporting Documents
Within each section, put the original documents first, followed by copies where appropriate.
11. Use Transparent Folders or Dividers
Avoid carrying loose papers in a plastic bag or envelope.
A simple document folder with labelled dividers can make a major difference.
For example:
1. APPLICATION
2. PASSPORT/ID
3. FINANCES
4. EMPLOYMENT
5. TRAVEL
6. SPONSOR
7. SUPPORTING DOCUMENTS
You should be able to locate a requested document within a few seconds.
12. Don’t Hide Documents
Never attempt to conceal information or provide false documents.
Visa applications are official processes, and submitting fraudulent or misleading documents can have serious consequences.
If you have a complicated situation, such as previous visa refusals, changes in employment or unusual financial transactions, make sure you understand the applicable requirements and answer questions truthfully.
13. Make a Final Checklist the Night Before
Before leaving for your interview, check:
- Passport
- Appointment confirmation
- Application confirmation
- Payment receipt, if applicable
- Required photographs
- Financial documents
- Employment/business documents
- Sponsorship documents, if applicable
- Travel documents
- Supporting documents
- Any documents specifically listed by the embassy
Also check the location, appointment time and entry requirements.
14. Don’t Overload Your File
A common mistake is carrying a huge pile of unrelated documents.
Your goal should be:
Complete + relevant + organized.
Don’t submit documents simply because someone told you that “more papers are better.”
The visa officer will assess your application according to the rules for the specific visa category.
15. Practice Finding Your Documents
Before the interview, ask yourself:
“If the officer asks for my bank statement, can I find it immediately?”
Then try:
“Show me your employment letter.”
“Show me your invitation letter.”
“Show me your accommodation details.”
“Show me your sponsorship documents.”
Practice finding each document quickly.
This can reduce unnecessary stress during the interview.
Final Thoughts
Good document organization won’t guarantee visa approval, but it can make your interview more organized, less stressful and easier to manage.
The most important rule is to follow the official requirements for your specific visa and destination country. Requirements differ, so applicants should always verify the latest checklist with the relevant embassy, consulate or official visa application centre before their appointment.
A simple rule to remember:
Check the requirements → Separate originals and copies → Use labelled sections → Put important documents first → Keep everything genuine and easy to find.
