
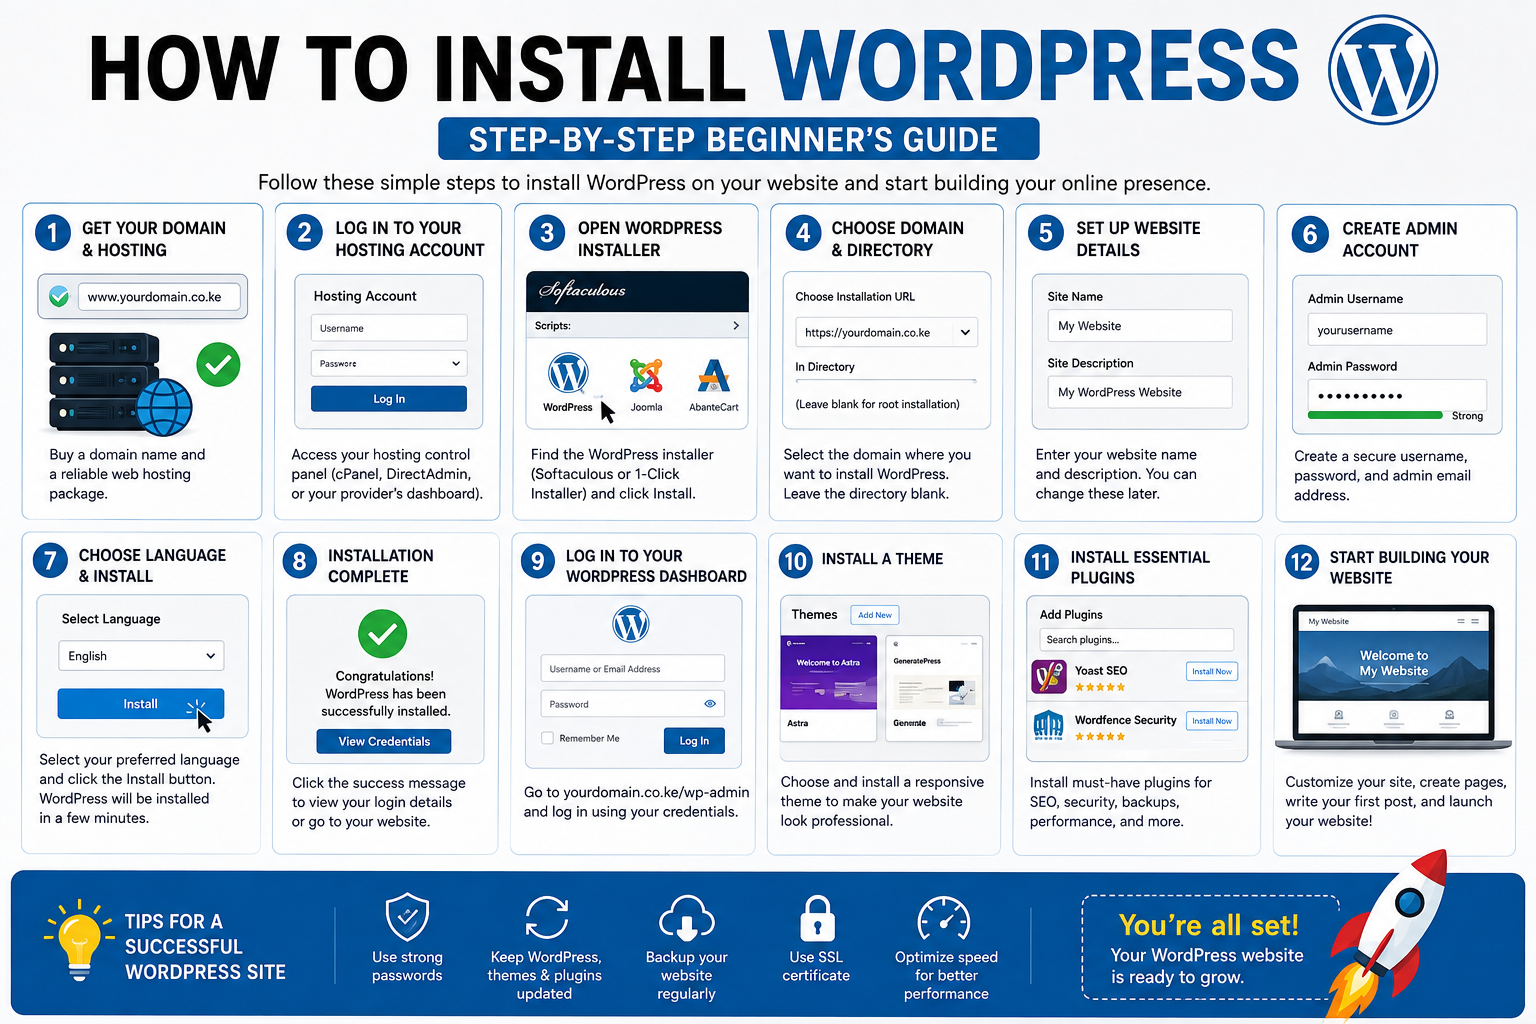

Starting a website can seem complicated if you’ve never worked with web hosting or content management systems. Fortunately, WordPress makes it possible to build a professional website without needing advanced coding skills.
Whether you want to start a blog, launch a small business website, create an online publication, build a portfolio, or set up an online store, WordPress provides the tools needed to manage your website from one dashboard.
For beginners in Kenya, the process normally involves three main components: registering a domain name, purchasing web hosting, and installing WordPress.
This guide explains how to install WordPress, what you need before starting, how to configure your new website, and the important security and performance settings to handle immediately after installation.
What Is WordPress?
WordPress is an open-source content management system (CMS) used to create and manage websites.
Unlike a website that has to be built entirely with code, WordPress provides an administration dashboard where you can create pages, publish articles, upload images, manage users and install additional functionality.
WordPress can be used for:
- Personal blogs
- Technology websites
- Business websites
- News publications
- Portfolio websites
- Online stores
- Membership websites
- Educational platforms
One of its biggest advantages is that you can start with a relatively simple setup and add features as your website grows.
What You Need Before Installing WordPress
Before installing WordPress, prepare the following:
1. A Domain Name
This is the address visitors will use to reach your website, such as:
example.co.ke
2. Web Hosting
Hosting provides the server space where your WordPress files, database, images and other website resources are stored.
3. Hosting Control Panel
Depending on your hosting company, you may receive access to cPanel, DirectAdmin or another hosting management system.
4. An Email Address
Use an email address that you regularly access because WordPress and your hosting provider may use it for important notifications and account recovery.
Step 1: Choose Your Domain and Hosting
If you haven’t created a website yet, start by registering your domain and purchasing a suitable hosting package.
For a small Kenyan website, shared hosting may be enough when you’re starting out. A website experiencing substantial traffic may eventually need VPS, cloud or another higher-performance hosting solution.
Don’t choose a hosting plan based only on the introductory price. Check:
- Renewal pricing
- Storage limits
- Backup policy
- SSL availability
- Customer support
- Server resources
- Upgrade options
- WordPress compatibility
Your hosting choice can have a significant effect on website speed and reliability.
Step 2: Connect Your Domain to Your Hosting
If your domain and hosting were purchased from different companies, you’ll need to connect them.
This is normally done by changing the domain’s nameservers or configuring the appropriate DNS records provided by your hosting company.
DNS changes may take some time to propagate.
If your domain and hosting were purchased from the same provider, this connection may already be configured for you.
Step 3: Log In to Your Hosting Control Panel
Once your hosting account is active, log in to its control panel.
Look for an option such as:
- WordPress
- WordPress Manager
- WordPress Installer
- Softaculous Apps Installer
- Website Installer
The exact name and location depend on your hosting provider.
Step 4: Start the WordPress Installation
Open the WordPress installer and select Install.
You’ll normally need to choose the domain where WordPress should be installed.
If you want WordPress to run directly from your main domain:
example.co.ke
leave the installation directory empty unless your hosting provider specifically instructs you otherwise.
If you enter something such as:
/blog
your WordPress installation may instead appear at:
example.co.ke/blog
Check this setting carefully before starting the installation.
Step 5: Enter Your Website Information
The installer will ask for basic website information.
Site Name
Enter the name of your website or business.
For example:
TechDrivers
Site Description
Add a short description explaining what your website is about.
You can change the site name and description later from the WordPress dashboard.
Don’t spend too much time trying to make these perfect during installation. Your priority should be getting the basic setup working correctly.
Step 6: Create a Secure Administrator Account
This is one of the most important parts of the installation.
Your administrator account gives you access to sensitive website settings, content and user management.
Use:
- A unique administrator username
- A strong, unique password
- A working email address
Avoid using predictable usernames such as admin.
Your password should be long and unique rather than something you’ve already used on another website.
If your hosting provider generates a strong password automatically, save it securely before completing the installation.
Step 7: Complete the Installation
After checking your settings, click Install.
The installer will create the WordPress files and database and configure the basic installation.
Once the process is complete, your hosting provider should display the website address and WordPress administration URL.
The standard WordPress administration address is:
example.co.ke/wp-admin
Your actual address will use your own domain.
Step 8: Log In to the WordPress Dashboard
Open your WordPress login page and enter the administrator credentials you created.
The dashboard is where you will manage your website.
From here, you can:
- Write articles
- Create pages
- Upload images
- Install plugins
- Change your theme
- Manage users
- Configure settings
- Monitor website activity
Take some time to understand the dashboard before installing large numbers of plugins.
Step 9: Enable HTTPS
Before publishing your website, confirm that it uses HTTPS.
You should normally see:
rather than:
HTTPS encrypts information transferred between visitors and your website and helps establish trust.
Many hosting companies provide SSL certificates at no additional cost, but availability and setup depend on the provider.
After activating SSL, check that your website loads correctly over HTTPS and that visitors aren’t being redirected between HTTP and HTTPS unnecessarily.
Step 10: Choose a Lightweight WordPress Theme
Your theme controls much of your website’s visual appearance.
When selecting one, consider:
- Mobile responsiveness
- Loading performance
- Accessibility
- Regular updates
- Compatibility with your WordPress version
- Compatibility with essential plugins
- Customisation options
A visually impressive theme isn’t necessarily a good theme if it adds unnecessary scripts and slows down your website.
For a news or technology publication, also consider whether the theme makes categories, navigation and article pages easy to use.
Step 11: Configure Your Permalink Structure
One of the first WordPress settings you should review is your permalink structure.
Go to:
Settings → Permalinks
For many blogs and publications, Post name provides a simple and readable URL structure.
For example:
example.co.ke/how-to-install-wordpress/
is easier for users to understand than a URL containing an arbitrary post ID.
Choose your URL structure before publishing lots of content because changing it later can create unnecessary redirects and broken links.
Step 12: Set Your Time Zone
If you’re running a website in Kenya, check your WordPress time-zone setting.
Go to:
Settings → General
and configure the appropriate time zone for your audience and publishing schedule.
This is particularly important for websites that schedule articles or display publication times.
Step 13: Install Only the Plugins You Actually Need
Plugins extend WordPress functionality, but installing too many can make your website harder to maintain.
Useful plugin categories include:
- SEO
- Security
- Caching
- Image optimisation
- Backups
- Contact forms
- Analytics
- Spam protection
Don’t install a plugin simply because someone recommends it.
Before adding one, ask:
Does my website actually need this feature?
A smaller, well-maintained plugin setup is generally easier to manage than a website filled with overlapping plugins.
Step 14: Create Essential Website Pages
Before promoting your website, create important pages that explain who operates the site and how visitors can contact you.
Depending on your website, these may include:
- About Us
- Contact Us
- Privacy Policy
- Terms and Conditions
- Editorial Policy
- Corrections Policy
- Advertising or Media Kit page
For publishers, these pages can help demonstrate transparency and make it easier for readers, advertisers and potential partners to understand the website.
Step 15: Create Your First Article
Once your website is configured, you can publish your first article.
From the dashboard:
Posts → Add New
Then:
- Write a descriptive headline.
- Add useful, original content.
- Use clear headings.
- Add relevant images.
- Add descriptive image alt text where appropriate.
- Select the correct category.
- Add relevant internal links.
- Preview the article.
- Check the mobile layout.
- Publish.
Don’t publish an article simply because you need to increase your post count. Focus on whether it provides something useful to the reader.
Step 16: Set Up Backups Before You Need Them
A website backup can save you from losing important content after a technical problem, failed update or security incident.
Your backup strategy should ideally cover:
- WordPress files
- Database
- Uploaded media
- Important configuration
Don’t assume that having a backup feature listed by your hosting company means you understand how to restore your website.
If possible, learn where your backups are stored and how restoration works.
Step 17: Secure Your WordPress Website
A new WordPress installation should not be left unattended.
Start with these basic security measures:
- Use a strong administrator password.
- Avoid sharing administrator credentials.
- Keep WordPress updated.
- Keep themes and plugins updated.
- Remove unused plugins and themes.
- Enable two-factor authentication where available.
- Use HTTPS.
- Maintain regular backups.
- Give users only the permissions they need.
If multiple people work on your website, create separate WordPress accounts rather than sharing one administrator password.
For example, a writer who only needs to publish articles generally doesn’t need full administrator privileges.
Common WordPress Installation Mistakes
Installing WordPress in the Wrong Directory
Entering an unnecessary folder name can result in your website appearing at /blog or another unexpected location.
Using “admin” as Your Main Username
Predictable usernames make it easier for attackers to target login attempts.
Installing Too Many Plugins
More plugins don’t automatically mean a better website.
Ignoring Updates
Outdated software can create compatibility and security problems.
Forgetting Backups
A website without a tested backup strategy can be difficult to recover after a serious problem.
Choosing a Theme Only for Its Appearance
A beautiful theme can still provide a poor experience if it is slow, difficult to navigate or poorly maintained.
Changing URLs Frequently
Changing your permalink structure after publishing many articles can create broken links and require additional redirects.
WordPress vs Website Builders
WordPress isn’t the only way to create a website.
Website builders can be easier for users who want an all-in-one solution, while WordPress provides extensive control over content, design and functionality.
WordPress may be particularly useful if you plan to:
- Publish frequently
- Build a content-focused website
- Add custom functionality
- Create a large publication
- Manage multiple contributors
- Develop an online store
The right platform depends on your technical requirements, budget and long-term plans.
Frequently Asked Questions
Is WordPress free?
The WordPress software itself is open-source and free to use. However, you normally need to pay for services such as domain registration and web hosting.
Some themes, plugins and professional services may also have separate costs.
Do I need coding skills to install WordPress?
No. Many hosting providers offer automated WordPress installers. Basic HTML, CSS or PHP knowledge can become useful later, but it isn’t required to start.
How long does WordPress installation take?
If your hosting provider offers a one-click installer, the actual installation can take only a few minutes. Connecting a domain, configuring HTTPS and preparing the website can take additional time.
Can I install WordPress manually?
Yes. WordPress can be installed manually by uploading its files, creating a database and configuring the installation. However, beginners may find an automated installer easier.
Can I change my WordPress theme later?
Yes. You can change your theme after installation. However, changing themes can affect menus, layouts, widgets and other design elements, so it is best to plan major theme changes carefully.
Can I move my WordPress website to another host?
Yes. WordPress websites can generally be migrated between hosting providers. The process involves moving the website files and database and updating the domain’s DNS configuration.
What to Do After Installing WordPress
Installing WordPress is only the beginning.
Before promoting your website, create a simple launch checklist:
- Confirm HTTPS works.
- Configure your site title and time zone.
- Set clean permalinks.
- Install a suitable theme.
- Create essential pages.
- Configure backups.
- Secure administrator accounts.
- Remove unnecessary plugins.
- Test the website on a phone.
- Publish useful original content.
- Connect your website to appropriate analytics and search tools.
Also check your website from the perspective of a first-time visitor. Can someone immediately understand what the site is about? Can they find your contact information? Does the website work properly on mobile?
These details matter just as much as getting WordPress installed.
Final Thoughts
Installing WordPress is relatively straightforward, but building a successful website requires more than completing the installation wizard.
For beginners in Kenya, the best approach is to start with a reliable domain and hosting package, configure WordPress securely, choose a suitable theme, keep plugins to a minimum and focus on publishing genuinely useful content.
Don’t try to build everything at once. Get the foundation right first, then improve the website gradually as your audience and requirements grow.
A well-maintained WordPress website can start as a simple blog and eventually develop into a business website, online publication, store or larger digital platform. The quality of that foundation will influence how easily your website can grow.
